Recently I entered the era of video-capable portable music players. About time, too. My device of choice is this Action-branded Taiwanese gem from 1988 with a 5-inch CRT display (B/W), AM/FM radio, television receiver, and cassette player (mono, no rewind). It takes 9 D-sized batteries.
![[Image: A person holding a portable television-cassette player measuring roughly 30 by 30 by 20 cm. The tape compartment is open and a yellow cassette is in. The device is labeled 'BLACK/WHITE TELEVISION-RADIO-CASSETTE PLAYER' with the brand name 'ACTION'. There's a cathode-ray type display roughly 20cm across; band selector for VHF low, VHF high, UHF, FM, and AM; A tuning wheel; a volume wheel; cassette control buttons on top; and a carrying handle. In the background, there's a bigger cassette deck, and a coffee cup with drawings of sheep.]](https://blogger.googleusercontent.com/img/b/R29vZ2xl/AVvXsEhmvkTO4mGRXmXaDyMY0KEiR0YUb_9zO_iSda9cURKbsxRvor6jeBR0O699OWJdPci4nBAUZHV8k3W7YlViel9ugthHXqrCiKNhZAsqu7zi8TuqfkRRlaWMCOFsMjTAspOosLs2TgWh2mku/s1600/IMG_3900a.JPG)
The batteries inside were leaking quite a bit so I removed them in favor of a DC adapter. They actually occupied roughly half of the casing. After removing them the device looked very empty and was unbalanced because of the heavy CRT. So I had to come up with something to fill the space with.
Then it struck me: it's a perfect video terminal and tape drive for the Raspberry Pi!
The screen
The Action has a 5" black-and-white CRT display and a television tuner. The receiver is on an AN5151N integrated circuit. Now, the Raspberry Pi outputs composite video. Someone else has tried injecting composite video onto the AN5151N before, with results that didn't look very successful to me at first sight, so I just ended up buying a cheap RF modulator. It modulates a TV-frequency carrier with the composite signal, and that can be fed into the aerial input of the TV to be demodulated again.
![[Image: The cathode ray display showing the Linux console running the 'top' command. On top of it, a Raspberry Pi with two small devices connected into its USB ports and an RCA cable connected into its analog video output.]](https://blogger.googleusercontent.com/img/b/R29vZ2xl/AVvXsEgrTUx4vD5zfq2QknAVEHURmr8EigyCEO-kZdhepzjSlcqwic2bzyV1X0I_uSX39qnvRd2Yl2HBBeiwknjnnXtTtmF-RNbPn_mb80hdvDHcy9IuzzGZN7GI0o2V1PHxktkdg6OtYwhyztFQ/s1600/IMG_3917a.JPG)
Aerial input to the TV is via a miniplug, so I had to improvise an adapter for coax. It works almost perfectly, except that the CRT crops out the extremes of the display.
The battery compartment before and after refurbishing:
![[Image: Two photos showing a big battery compartment, empty in the first picture and filled with electronics in the second one, with several wires coming out.]](https://blogger.googleusercontent.com/img/b/R29vZ2xl/AVvXsEhK7HNyMLktz3pdsg_JQdUyWd5ZoQTQxXZslB8VFU9dTE4NL3-xKbMZR_hgZsZ5TtrdALsh9gD8mNYhZ1iHHaz6Ah7dEQ-lmuwpayK6KUhJLrzbYgCMafkidsE7CUrDLREbkH_nv2EGO5Y8/s1600/IMG_3921a.JPG)
The tape
The cassette player of this device is pretty simple. It does not have stereo, rewind, auto-stop, or any of the other hi-tech functions that many modern-day Walkmen have. It doesn't even stop automatically when Eject is pressed. But it works.
![[Image: The cassette player opened, showing the tape drive mechanism with several wheels connected to each other via rubber strings, and the control buttons connected to them via springs and levers.]](https://blogger.googleusercontent.com/img/b/R29vZ2xl/AVvXsEgX0QJMw52YmB_RtqpJbHGhz8mrgBxSw4zJrMC5LXwfF5WHwTZToENXSFJvBcYQ7UIX8-lawC56sMUlJxBDP4hQwv4kyUliMcvpsjiyJ9wnb34_ZWSgtUr7T1zGk6QF1daeUexgb7BcLHoT/s1600/IMG_3924a.JPG)
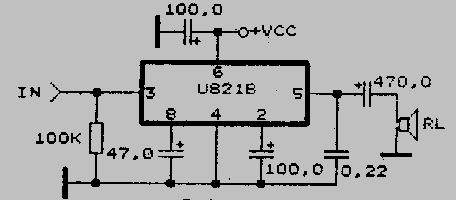
I've written a little Perl program that can write data onto cassettes and read it back using a sound card. For this project I removed the sound card step. The way I've written the data onto the tape is such that when amplified with the tape player's U821B chip, the voltage can directly be used as a binary 3v3 GPIO logic level. I wouldn't recommend this though, unless you know what you're doing, because the GPIO port is essentially a direct connection to the CPU and there's no overvoltage protecti... blast, I've just fried my RasPi!
A moment of silence. And a screenshot honouring the memory of its last words over ssh. Here, a logic "1" is low voltage, and "0" is high. A wee bit too high.
111111111111111111111111111111111111111111111111111111111111111111111111111111111111
111111111111111111111111111111111111111111111111111111111111111111111111111111111111
111111111111111111111111111111111111111111111111111111111111111111111111111111111111
111111111111111111111111111111111111111111111111111111111111111111111111111111111111
111111111111111111111111111111111111111111111111111111111111111111111111111111111111
111111111111111111111111111111111111111111111111111111111111111111111111111111111111
111111111111111111111111111111111111111111111111111111111111111111111111111111111111
111111111111111111111111111111111111111111111111111111111111111111111111111111111111
111111111111111111111111111111111111111111111111111111111111111111111111111111111111
111111111111111111111111111111111111111111111111111111111111111111111111111111111111
111111111111111111111111111111111111111111111111111111111111111111111111111111111111
111111111111111111111111111111111111111111111111111111111111111111111111111111111111
111111111111111111111111111111111111111111111111111111111111111111111111111111111111
111111111111111111111111111111111111111111111111111111111111111111111111111111111111
111111111111111111111111111111111111111111111111111111111111111111111111111111111111
111111111111111111111111111111111111111111111111111111111111111111111111111111111111
111111111111111111111111111111111111111111111111111111111111111111111111111111111111
111111111111111111111111111111111111111111111111111111111111111111111111111111111111
111111111111111111111111111111111111111111111111111111111111111111111111111111111111
111111111111111111111111111111111111111111111111111111111111111111111111111111111111
111111111111111111111111111111111111111111111111111111111111111111111111111111111111
111111111111111111111111111111111111111111111111111111111111111111111111111111111111
111111111111111111110110011Write failed: Broken pipe
$ █
Anyway, I also modified the TV's power circuitry to supply power to both the CRT and tape player at the same time, and installed a switch to silence the speaker when reading data. If it weren't for the aforementioned overvolt accident, this would now be complete. Cassettes could be used to store e.g. Vectrex games; also reading C64 cassettes will be supported.
Moral of the story: The GPIO port is not 5V tolerant! Assuming there will a second attempt some day, I'll just use a transistor to pull the GPIO pin high when there's a high on the tape. Or use a sound card.


0 Comments